
Injection Molding Design Guide for Mass Production
Optimize your plastic part design for manufacturability, cost-efficiency, and quality.
Injection molding is one of the most widely used manufacturing processes for mass production of plastic parts. To ensure successful production, it’s essential to follow several key design for manufacturability (DFM) guidelines. This guide highlights the most important principles in mold design that impact cost, lead time, and product quality.
Fundamental Design Guidelines
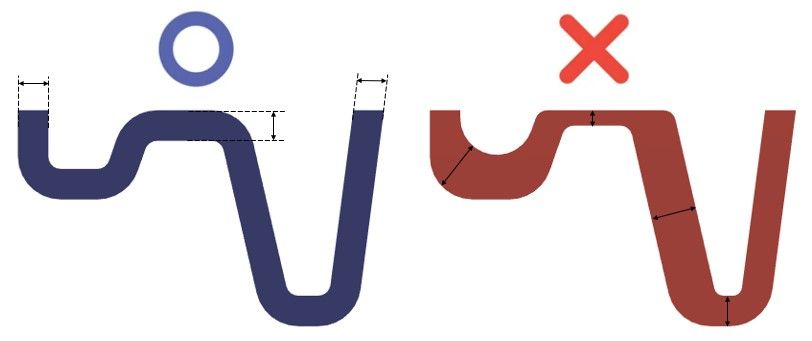
Uniform Wall Thickness
Maintaining consistent wall thickness is crucial in injection molding. Uneven walls can lead to warping, sink marks, and unbalanced cooling.
- If variations in wall thickness are necessary, use fillets or chamfers to smooth transitions and prevent sudden changes.
- Smooth flow of material ensures uniform filling of the mold cavity and improves final part quality.
Rib Design
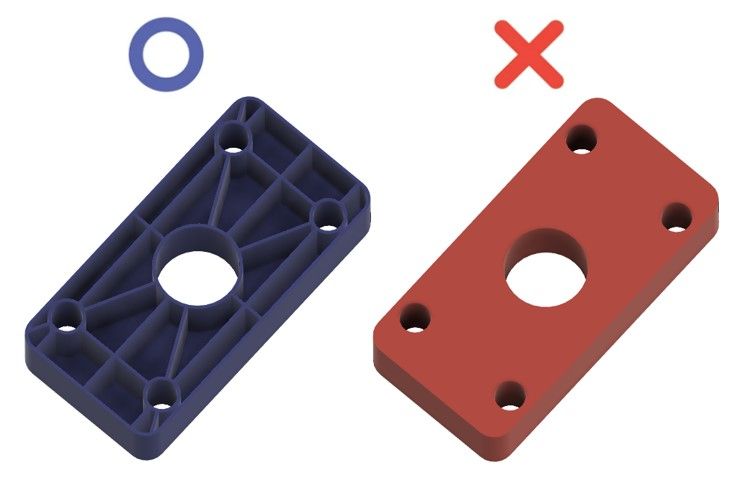
Ribs are used to reinforce parts without increasing wall thickness. Instead of thick walls—which can cause warping, shrinkage, and slow cooling—designing with ribs enhances structural strength while maintaining efficient production.
Best practices for rib design:
- Use multiple thin ribs instead of one thick rib.
- Ribs should follow the flow direction of the molten plastic.
- Ensure proper draft angles to facilitate mold release.
| Feature | Recommended Value |
| Rib thickness | ≤ 0.5 × wall thickness |
| Rib height | ≥ 3 × rib thickness |
| Rib fillet radius | ≥ 0.25 × rib thickness |
| Rib spacing | ≥ 4 × rib thickness |
| Draft angle | Nylon: 0.5° / ABS & PC: 0.5–1.5° / Reinforced ABS & PC: 1–3° |
Coring Out Thick Sections (Shell)
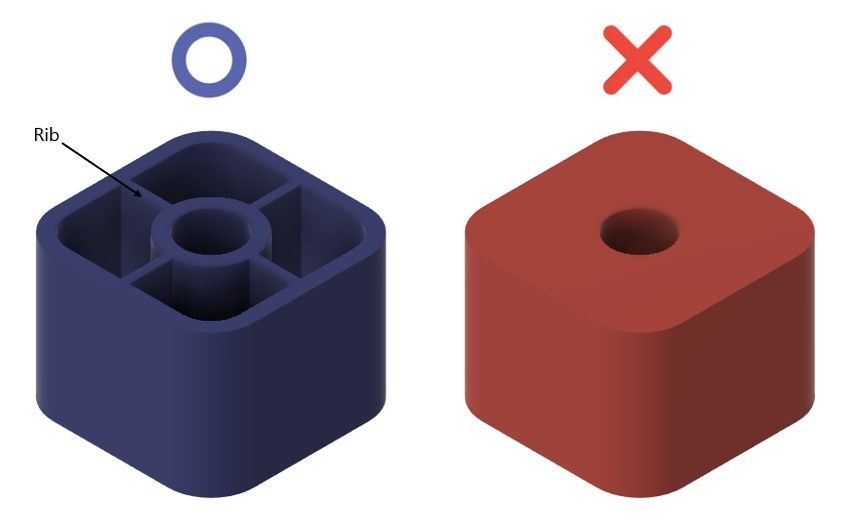
To reduce material usage and cooling time, avoid solid thick sections. Instead, core out the part and reinforce it with ribs to maintain strength.
| Material | Recommended Wall Thickness (mm) |
|---|---|
| Polypropylene (PP) | 0.8 - 3.8mm |
| ABS | 1.2 - 3.5mm |
| Polyethylene (PE) | 0.8 - 3.0mm |
| Polystyrene (PS) | 1.0 - 4.0mm |
| Polyurethane (PUR) | 2.0 - 20.0mm |
| Nylon (PA6) | 0.8 - 3.0mm |
| Polycarbonate (PC) | 1.0 - 4.0mm |
| PC/ABS | 1.2 - 3.5mm |
| POM | 0.8 - 3.0mm |
| Silicone | 1.0 - 10.0mm |
Note: Most general-purpose plastics are safe with wall thicknesses between 1.2 mm and 3 mm.
Boss Design
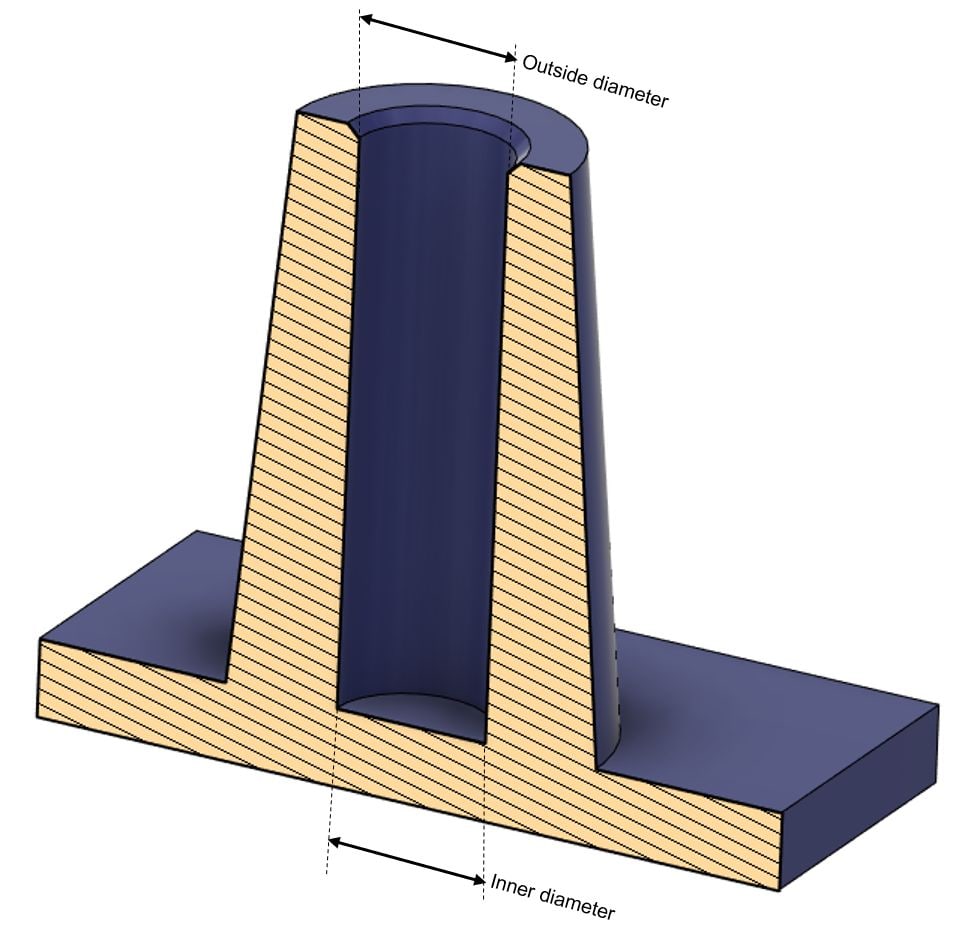
A boss is a cylindrical feature commonly used in plastic part design to enable the assembly or fastening of one component to another. Bosses play a crucial role in injection-molded part design, especially for mechanical connections.
There are two common ways to use bosses:
- Interference fits
- Screw fastening
For screw assembly, internal threads must be created within the boss. However, since threads typically require undercut features, they cannot be directly molded using standard injection molding techniques.
To address this, a metal insert nut can be embedded in the boss. These insert nuts allow for strong, reusable threads and are ideal for applications that involve repeated assembly or high torque.
Learn more about insert nuts in the functional feature design section below.
Design recommendations for bosses:
- Outer diameter: approx. 2× insert diameter
- Inner diameter: match the screw core diameter
- Use ribs to reinforce tall bosses
- Maintain uniform wall thickness around the boss
- Apply a chamfer at the top opening to assist with screw insertion
Draft Angle
In the injection molding process, once the molten plastic cools and solidifies, the mold opens and the finished part is pushed out using ejector pins. While this ejection step may seem simple, it can lead to serious surface defects if not properly designed.
When the molded part scrapes against the metal mold during release, even minor scratches can significantly impact the surface quality and commercial appeal of the product.
To prevent such issues, it's essential to incorporate a draft angle in the mold design. The draft angle provides a slight taper on vertical surfaces, allowing the part to be smoothly released from the mold without sticking or causing damage. It's a critical element in ensuring high-quality, defect-free molded parts.
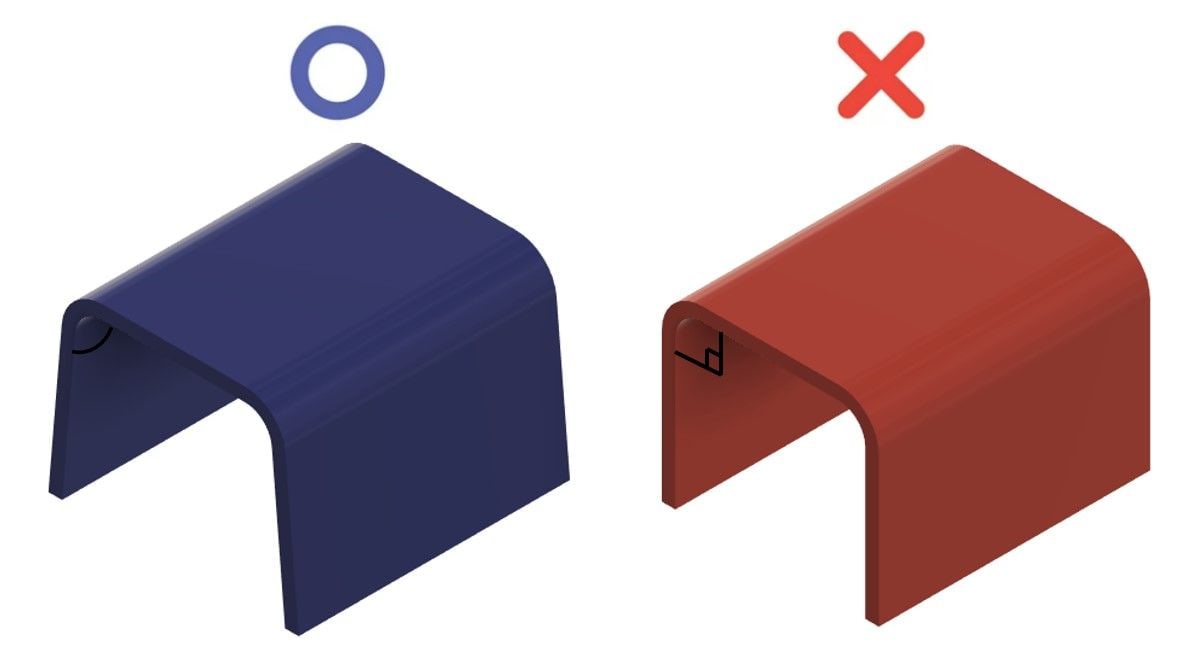
Recommended draft angles:
| Feature | Value |
| Minimum draft angle | ≥ 0.5° |
| Preferred draft angle | ≥ 2° |
| Tall parts (over 50mm) | Add 1° for every 25mm height |
| For textured or etched surfaces | Add 1–2° extra |
| Ribs also require draft | Ensure wall thickness compliance |
Fillet
Sharp corners in molded parts can lead to stress concentration and potential cracking. Applying fillets (rounded edges) helps distribute stress and improve plastic flow during molding.
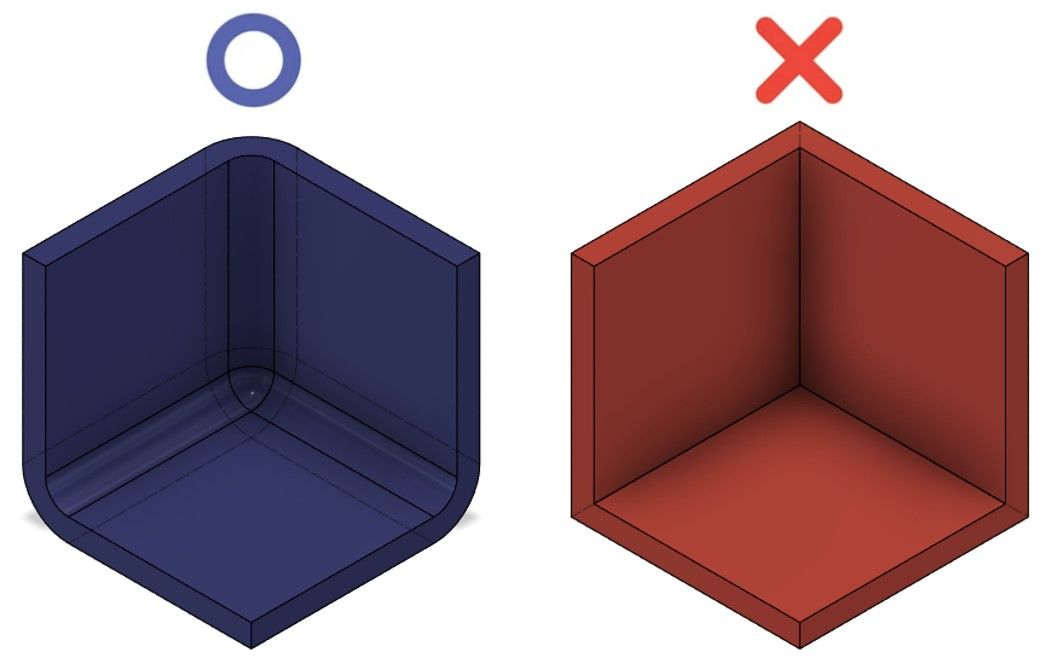
Fillet design guidelines:
- Maintain smooth internal transitions to aid material flow
- Inner corner radius: ≤ 0.5 × wall thickness
- Outer corner radius: ≥ inner fillet + wall thickness
- For step changes, fillet length should be at least 3× height difference
Undercut Considerations
Undercuts are features that prevent direct ejection from a straight-pull mold (e.g., hooks, holes perpendicular to mold direction). They increase tooling complexity and cost.
Why avoid undercuts:
- Require additional components like slides or lifters
- Increase mold manufacturing and maintenance costs
- Can reduce mold durability and slow production speed
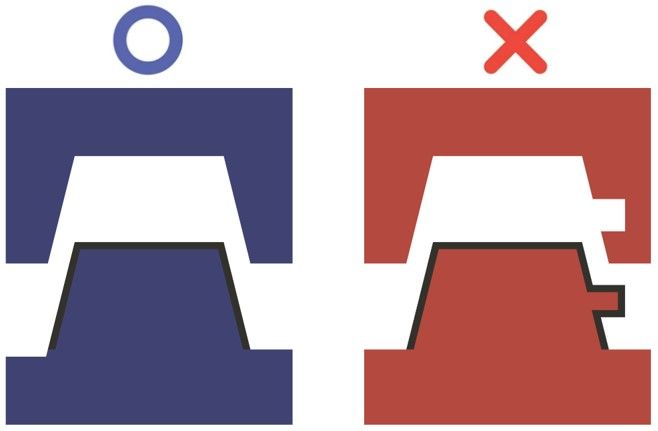
Alternative Design Solutions to Avoid Undercuts
When undercuts are necessary, consider the following cost-saving design alternatives:
- Parting Line Shift
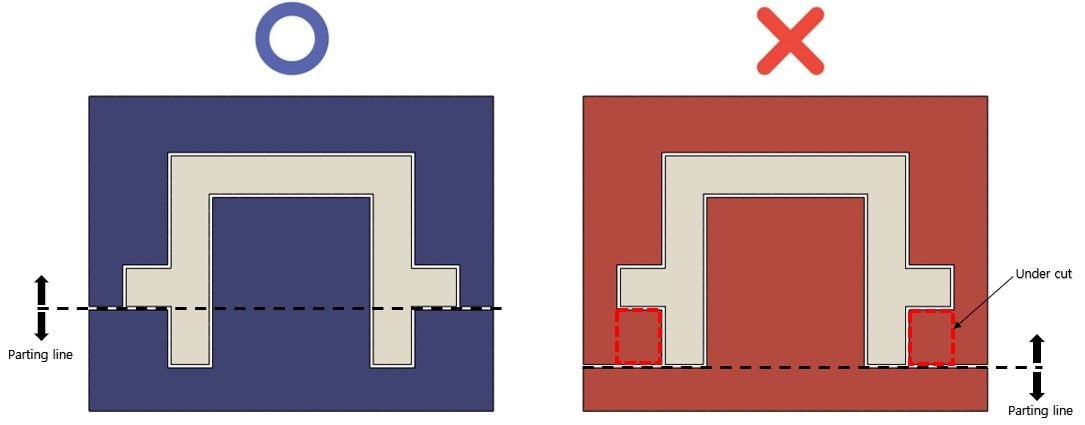
Repositioning the parting line can eliminate external undercuts by dividing the mold differently. This is an efficient solution for minor undercuts.
- Forced Ejection
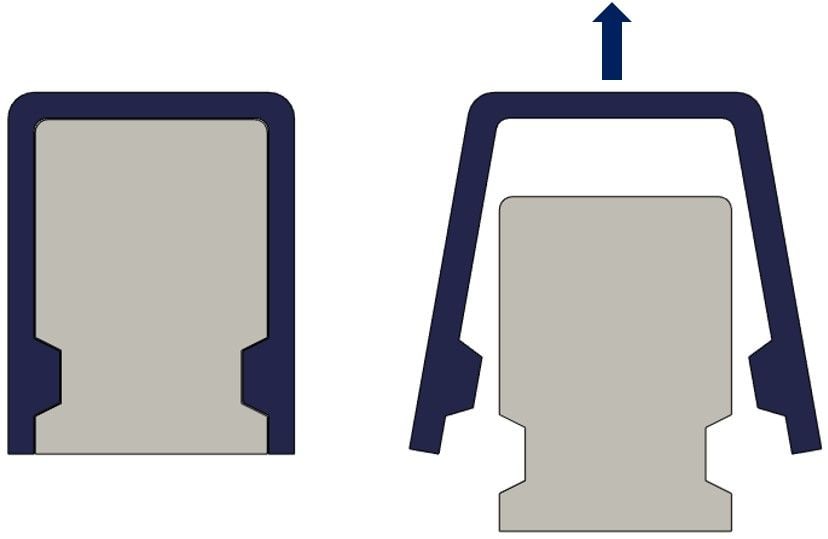
If the material is flexible, small undercuts can sometimes be removed using forced ejection. Conditions for this approach:
- Soft, elastic materials (e.g., HDPE, Nylon)
- Minimal interference features (no ribs or sharp corners)
- Undercut angle: 30°–40°
Functional Features
Insert Nuts
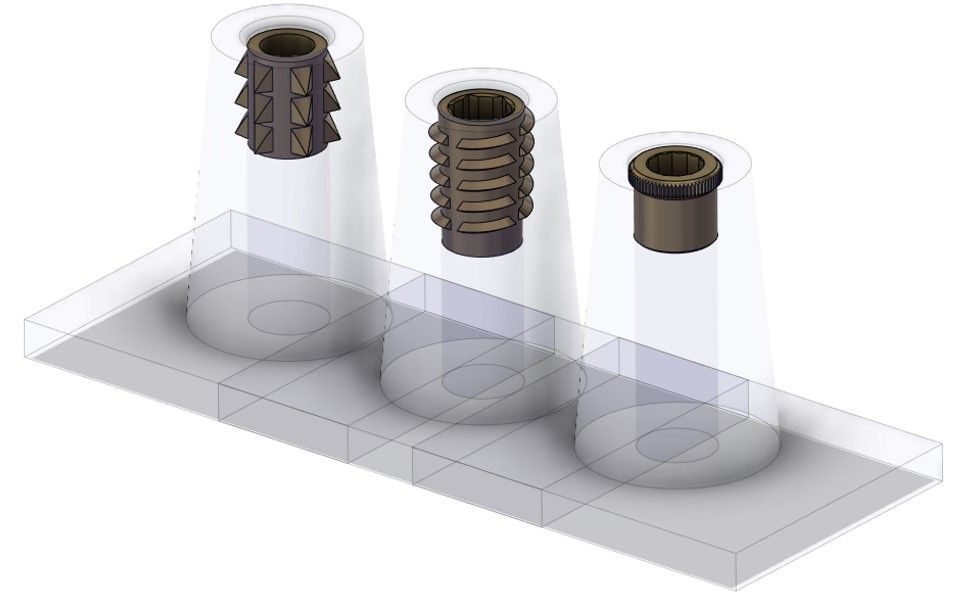
Insert nuts are embedded metal fasteners used to improve thread strength and durability in plastic parts. They allow repeated assembly and disassembly.
- Recommended with countersink bosses
- Can be installed via heat, ultrasonic, or in-mold insertion
- Use standard thread types for compatibility
Snap-Fits
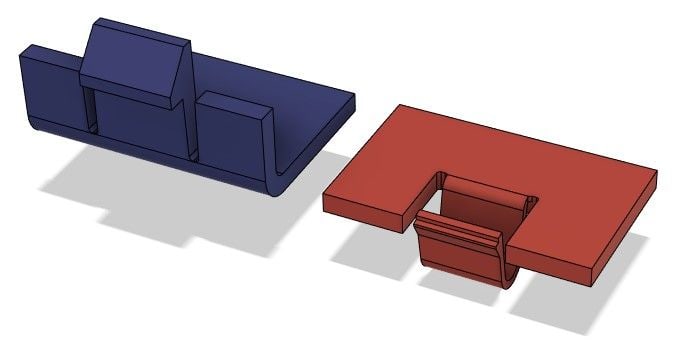
Snap-fit joints provide quick and tool-free assembly. They are ideal for lowering unit cost and assembly time.
Design tips:
- Thickness: 0.5 × wall thickness
- Include a draft angle on vertical snap-fit walls
- Avoid undercuts if possible
- Accurate calculation of flexural strength and yield stress is critical for durability
Living Hinges
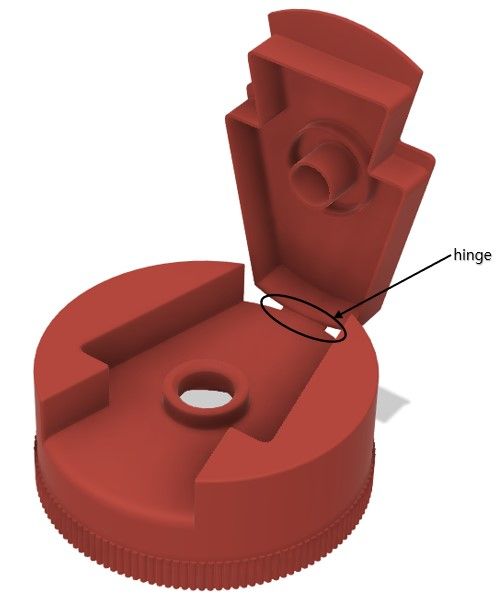
A hinge is an integral feature that connects two parts of a component, allowing them to bend or flex while remaining attached. Hinges are commonly used in plastic containers, caps, and consumer packaging, and they rely heavily on the elastic properties of the material.
Since hinges must endure repeated bending without breaking, careful consideration of material flexibility and yield strength is critical during the design phase. Like snap-fit features, hinges often require extensive prototyping and mechanical testing to ensure long-term durability and performance in injection-molded parts.
- Minimum hinge thickness: 0.2–0.35mm
- Maximize the hinge radius to reduce stress
- Use flexible materials like PP, PE, or PA
- Match hinge wall thickness to adjacent part walls when possible
Molded Text (Lettering)
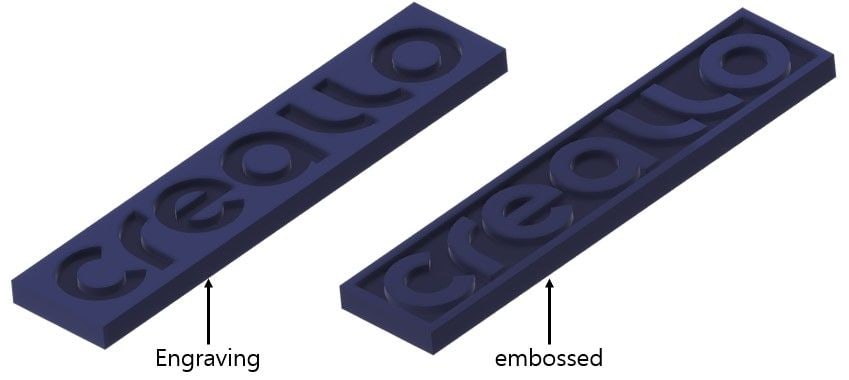
Adding logos, part numbers, or symbols enhances traceability and branding. Design considerations:
- Height: ≥ 0.5 mm (raised lettering)
- Use rounded fonts ≥ 20pt
- Keep stroke width consistent for clean mold engraving
