
Design Optimization Guide for 3D Printing
3D printing is a manufacturing technology that offers distinct advantages in creating complex geometries compared to traditional production methods. However, to ensure print quality and smooth post-processing, several key design principles should be taken into account. This guide outlines the essential factors that must be reviewed before actual printing, focusing on the most important elements.
For specific dimensional guidelines, please refer to the resource below.
View 3D Design Guide for Improved Manufacturing Quality→
View 3D Modeling Requirements for Manufacturing→
Optimizing Material Usage
In 3D printing, print time is generally proportional to the volume of the object. The greater the material volume—i.e., material usage—the longer the processing time and the higher the cost. By applying shell structures to optimize material usage, you can reduce the overall printing cost while also decreasing the risk of warping, defects, or breakage due to weight concentration in certain areas.

Optimizing Wall Thickness
Walls that are too thin may deform during printing or break easily during post-processing. Conversely, excessively thick walls may lead to material waste and the development of internal stress, which can cause problems. Recommended wall thickness varies depending on the printing process, but generally, maintaining a thickness of at least 0.8mm is advisable for structural stability. In particular, for tall vertical structures or parts with fine details, minimum thickness should be set more conservatively.

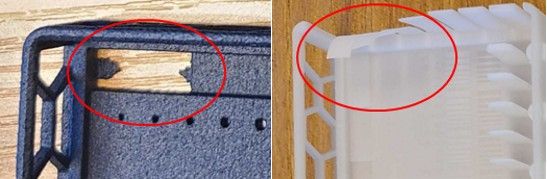
Optimizing Gaps
If the distance between adjacent parts is too narrow, they may end up fused together during printing. A gap of at least 1mm is generally recommended for safe separation during the printing process.

Weight Balance of the Overall Geometry
Structures with significant weight imbalance are more susceptible to breakage due to the concentration of stress. It is recommended to optimize for balance by hollowing out dense areas or splitting the part into multiple sections for separate printing followed by assembly.


Design Considerations for Hollow Structures
In powder-based or resin 3D printing, unused material (liquid or powder) can remain inside the object after printing. To remove these materials effectively, appropriate drain holes must be added. If the location or number of drain holes is insufficient, leftover material may harden inside the part, adding unnecessary weight or negatively impacting performance.
Additionally, covering drain holes after printing may leave visible marks. During the design phase, consider where the drain holes can be placed discreetly and functionally, especially when creating hollow internal structures.
Considering Overhangs and Support Structures
Since 3D printing builds objects layer by layer, features with overhangs greater than 45 degrees or floating geometries may not be printable without support structures. It's best to minimize overhang angles and design geometries that can be printed without supports. If supports are required, place them in positions that allow easy removal after printing.
Be aware that removing supports may leave rough surface marks. If these areas are critical for appearance or precision, support placement and removability should be considered during the design stage. Especially for narrow or internal features where access is limited, supports may not be fully removable, leading to quality degradation. Therefore, if post-processing tasks such as sanding, painting, or assembly are needed, verify in advance whether the geometry allows for effective post-processing.
To ensure precise prints and stable post-processing, it is critical to understand and incorporate the characteristics of the 3D printing process from the design stage. Use this guide to design more efficient and high-quality outputs before you print.
